How to uninstall/Downgrade Windows 10 to 8.1/7/XP: Everyone wants to Uninstall Windows Without Losing any personal Files. Hai friends, are you using Windows 10 which you have upgraded from Windows 8.1 or Windows 7, XP? Do you want to Roll back your Windows 10 to Windows 8.1-7-XP version without deleting your own personal files?
Most of you known that Windows10 has better features than any windows products like Windows Home Basic, Windows Ultimate, Windows Vista etc.. that we got till now, But it has some drawbacks. Just read my full Article, to know “How to Uninstall Windows 10 and Downgrade to Windows 7, 8.1, 8“.
- Note: The steps that I am going to give now are only useful when you have upgraded from Windows 7/8.1/XP to Windows10, but these steps do not work if have installed Windows 10 by reboot methods(Important to note).
We did not get the full version of Windows 10 till now, right? If you are using Windows 10 you might have faced some of the problems while installing the apps and etc., If you have Upgraded your Windows 7/8.1/XP to Windows 10 still you want your Windows 7, 8.1, XP version, then follow the simple steps that I am going to show you now.We have various methods to Downgrade Windows 10 to 8.1/7/XP, but I think this is the easy and best way to downgrade from Windows 10 to Windows 8.1.
If you happened not to like Windows 10, or you’re having issues, Microsoft is adding the “Go back to Windows 8.1, 7, XP” feature to make the process a lot easier. However, the downside is that you only have a month after you upgrade to Windows 10 to go back. If you’re still within a month after the upgrade you can follow these steps to go back: Then here I am presenting an article for you, that will help you to Downgrade Windows 10 to 8.1/7/XP
Steps to Recovery/Downgrade Windows 10 to 8.1, 7, XP (PC, Laptop):
Step 1) Open the PC/Laptop settings by using “Windows+I” shortcut.
Step 2) Go to Update and Security settings. Below that you can see Windows Update Recovery, and Backup. click on “Update and Security” options.

Step 3) After opening Update and Security you can see 6 options left the side of the window, Now click on “Recovery option“.
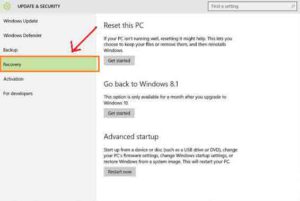
Step 4) Upgraded- If everything is set correctly in your system, you’ll see the option Go back to Windows 8.1. Here simply click the Get started button.(Note: It appears only when upgraded from Windows 8.1 to Windows 10 only.)
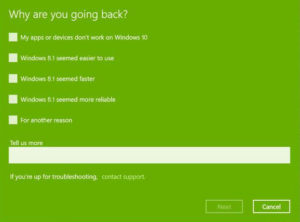
Step 5) After clicking on the Get started you are going to give feedback about your unwillingness towards windows10 or willingness towards windows 8.1. you can select any option as you like. (It’s Mandatory step.), Then click on Next button.
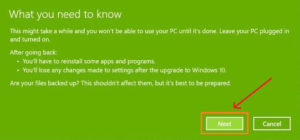
Step 6) After clicking on Next button you will get a warning message like”You’ll get a warning that you’ll need to reinstall some apps and programs, and you’ll lose any changes made after upgrading to Windows 10. A file backup is not necessary but recommended”. And then click Next.
Step 7) Make sure you know your Windows 8.1 password as you’ll be locked out of the system without it, and then click Next.
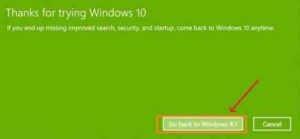
Step 8) Finally, click the “Go back to Windows 8.1” and let the process complete to Downgrade Windows 10 to 8.1.It may some minutes to complete the process and make sure that your PC in Turned on.
Note: The process will take some time depending on your system configuration. Once you’re back on Windows 8.1, don’t forget to check all your apps are installed correctly and check for new updates.
Tips after completion of Downgrade Windows 10 to 8.1/7/XP:
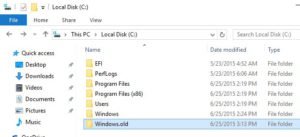
- Go to your Local disk(C), You can see the folder with the name Windows.old. This works because Windows 10 stores your old Windows installation in the folder named “C:\Windows.old” on your computer. You can see this folder in File Explorer though you shouldn’t attempt to delete it from here. You can also browse the Windows.old folder and restore files from it.
- If you’re sure you don’t want to go back to your previous version of Windows, use Disk Cleanup tool to remove those files and immediately free up space.It can be done by “free up disk space by deleting unnecessary file/Disk clean up” for this you can search this in the search panel.
I hope you understood it clearly.If you find any difficulties while doing it, please go through the steps once again. If you get benefited from this Article”Step to Uninstall/Rollback/Downgrade Windows 10 to 8.1/7/XP“, consider share this Article, with your friends too. Please give your comments.Thank you.For More Updates Visit back.